Guessing what your customers want rarely works on its own. We can make an educated guess for a start—and what we do after that guess is what makes the biggest impact.
Testing, i.e. trial and error, is the backbone of all business activities. No matter the industry, companies must rely on testing to figure out what messaging, images, and positioning of elements resonate with their customers the best.
To manage and measure tests across digital experiences, a platform specifically designed for this is a must-have in enterprise day-to-day. And that’s where Adobe Target comes in handy.
Running A/B Tests in Adobe Target
A/B testing in Adobe Target, once known as Adobe Test & Target, is the process of comparing one or more variations of your digital experiences against a control experience. For instance, you might be testing a new variation of your pricing page against the existing version of it.
There are three ways of A/B testing in Adobe Target: manual A/B testing, auto-allocate A/B testing, and auto-target A/B testing. In addition to those three, Adobe Target also gives you the option for more complicated multivariate tests. Let’s dive into each of these a bit further.
Manual A/B testing
Adobe Target’s manual A/B testing is the most straightforward of all A/B testing options. It enables you to test multiple variations of your digital experience against your existing experience to find the best possible results.
With manual A/B testing, you’ll be able to specify the audiences and the allocation that each of your variations will serve.
Manual A/B testing is a good choice when:
- You already know what elements of your experience you need to test variations of.
- Your number of test variations is 5 or below, and they don’t cover multiple locations.
- You’re testing all-encompassing changes (including whole layout redesigns).
- Your new variation’s design doesn’t isolate specific elements for testing.
If you run into a situation where you don’t meet the criteria above, you’ll want to look into multivariate testing first (we’ll cover that option in a second).
Auto-Allocate A/B testing
Auto-allocate is another type of A/B testing that specifically helps you decide which test variations to allocate the most exposure to.
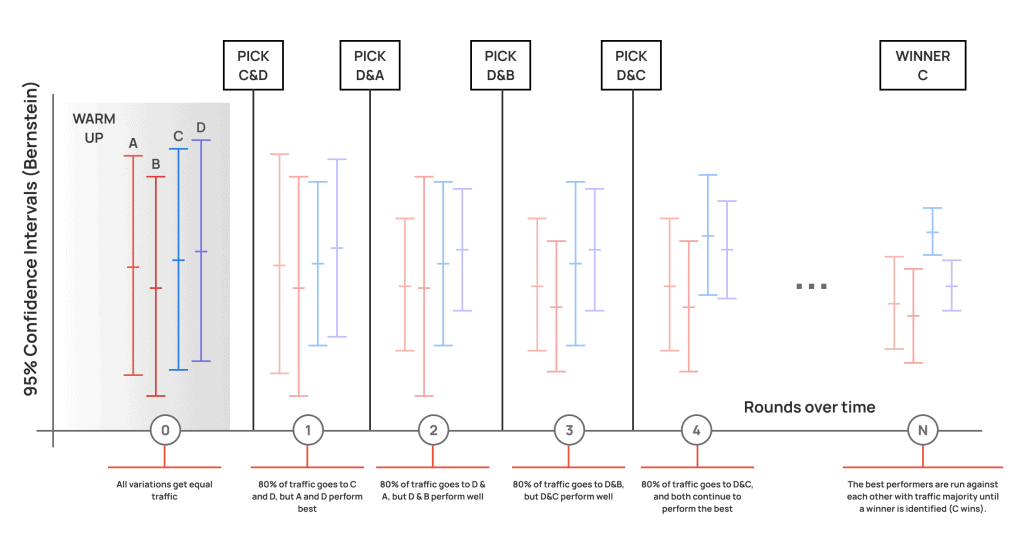
Rather than waiting until the end of a test to respond to the results as you normally would, auto-allocate begins to send more traffic to the best-performing variations while the test is ongoing. This helps you optimize toward your success metrics proactively during the test, instead of reactively afterward.
The auto-allocate algorithm accomplishes this by assigning 80% of your traffic to the variation(s) achieving the highest performance, while still reserving 20% of your traffic to distribute among all variations indiscriminately.
The latter 20% ensures that your test accounts for changes in user behavior as time passes, allowing it to adapt accordingly if unexpected variations perform better later in the test.
Auto-allocate is a wise choice for A/B test when:
- You need to find a winning variation ASAP (typically winners are established faster with auto-allocate than with manual A/B).
- You want to minimize the amount of traffic you sacrifice toward poorer-performing variations and ensure more consistent or predictable performance gains.
- You have (or plan to have) a license for Adobe Target Premium.
Auto-Target A/B testing
Auto-target capitalizes on advanced machine learning to deliver individual experiences to each user. Rather than showing the same test experience to every user, it optimizes toward your goals by showing users a personalized experience based on their profiles, and the activity of customers similar to them.
This type of A/B test is considered an “always on” test, meaning it never needs to end because it’s constantly working to show the best-fit experiences to each user in an attempt to lift performance perpetually.
Auto-target uses a Random Forest algorithm to collect data from randomly served experiences and customer data you provide to predict high-performing personalized experiences for each user.

Just like auto-allocate does, auto-target always reserves a portion of traffic as a “control” that will be served randomized (non-personalized) experiences to better measure the performance lift achieved from its personalized variations.
Auto-target is a wise choice for A/B testing if:
- You have (or expect to have) an Adobe Target premium license (it’s not available in Adobe Target standard).
- You’re working toward customer experience maturity by investing in personalized experiences tailored to individual customer profiles and journeys.
- You want to achieve an “always on” lift managed by machine learning and save time on manual tests based on human estimates of lift.
Adobe Target Multivariate Testing
Multivariate testing in Adobe Target involves testing multiple variations of multiple elements on your site at once to find 1) the best-performing combination of all elements, and 2) the most impactful individual element.
The sheer number of combinations of elements and their variations that Adobe Target will need to collect data on means that this type of test will require more site traffic to reach statistically significant results, and will take longer to conclude.
But you don’t need to break out the permutation calculator to guess how much traffic you’d need to decide on a winner among all those combinations. Adobe Target provides a Traffic Estimator to do that heavy lifting for you.
Multivariate testing would be a good choice if:
- You have three or more elements to test on the page. (Any less, and you should do an A/B test).
- You have a high enough level of traffic to justify the absolute minimum number of elements you’d need to test.
- You don’t have a clearly defined idea of the most effective combination of elements on a page.
- You don’t have a clear picture of which type of element has the most impact on a page.
- You’ve just done a redesign on a page, or developed a new page, resulting in the two above unknowns.
We also recommend that you employ multivariate testing and A/B testing in conjunction with one another (they don’t have to exist independently). An example of an ideal time to use them together would be using multivariate testing to pinpoint which element has the most impact on a page, and then using A/B testing to find new, better-performing variations of that one element.
The A/B Testing Process
No matter what stage of the digital customer experience you’re a part of, A/B testing is the best way to find the experiences best suited to turn prospects into diehard fans of your brand.
When you’re looking into A/B testing your digital experiences, there are certain steps you’ll want to follow to ensure successful and meaningful testing.
1. Define your testing goals
Every great test begins with a hypothesis. This hypothesis will likely come from data you’ve already collected about your existing experience, pointing to an opportunity for improvement.
For instance, you might have inferred from a heatmap or activity map of your site that customers aren’t clicking on your CTA button as much as they could be. Or, you might have noticed that mobile site visitors lose interest and drop off after a certain point on a page.
Your goal will be what you aim to improve with this test, whether that’s click-through rates on your CTA button, time on the page/site, etc. Once you have a clear goal of what’s important to you, test development can begin.
You’ll be able to define your goals (along with your success metrics) in Adobe Target’s goals and settings feature.
2. Establish your success metrics
Ultimately, your test’s measure of success will relate to your initial goals. You can’t necessarily expect that your success metrics will be the same between different tests.
For example, if your goal is to increase the number of people who click your CTA button, it would make sense for your success metric to be the click-through rate on that button.
Once you know what your success metric(s) will be, you’ll also need to define a realistic goal for improvement of these metrics. Realistic goals are typically small, incremental improvements, and you certainly need to take into account the relative difficulty of achieving these goals across your funnel.
It could be an easy incremental ask to aim for a 20% improvement in time spent on site. However, it may be less reasonable to expect a 20% improvement in lead forms completed (because it requires more intentional commitment from users).
3. Create variations for your test
Once you know what you’re testing, you’ll need to set up the experience variation for your test. This variation is a version of your site experience that will host the changes you want to test against your “default” experience.
These variations may be as small or as significant as you need them to be. Remember, sometimes even the smallest of changes can be responsible for the largest differences.
For example, if you’re finding that customers don’t click a button, you could test a different color of the button, or you could add a text addressing common objections, say “no card required”.
Or, if you find that mobile users seem to drop off too often before they pass the hero section of a landing page, you could test removing heavy images for mobile design.
4. Set up audience segments
You don’t have to show your test variation to everyone. In fact, in most cases, it’s best if you don’t try new things out on everyone in the world. However, your test audience will depend on the data or analyses that led you to launch this test in the first place.
If it’s mobile users that are dropping off before they’ve crossed the hero image, then it’s mobile users that you’ll want to run this test on.
If you find that it’s Mac users in the United States who aren’t clicking your CTA button, you’ll want to show a new variation to them to find out what kind of CTA resonates with that audience better.
Adobe Target lends you advanced audience targeting capabilities using “and/or” boolean rules to make your audience criteria as specific as you need them to be.
5. Determine the allocation of the test
If you’re running a manual A/B test, you’ll need to determine what percentage of users should see the new variation(s), and what percentage should see the control experience.
The default setting for a “true” A/B test is 50/50, indicating that half of all users in your audience will see one experience or the other. This is technically the fairest split between variations, but there are circumstances when you might not want to go this route.
Let’s say that your current experience is working well, and your goal is to see how you can improve it further. It might be best to allocate more traffic to the control experience and test only a small percentage of traffic on your new variation.
6. Launch and monitor your test
Once you’ve set your test up fully, determined who it will show to, and in what capacity, then all you need to do is launch and watch.
A truly complete test is one that’s achieved statistical significance—i.e. a test that has acquired enough data to prove that the results you’re seeing aren’t random, and are directly influenced by your changes.
7. Analyze and put insights into action
When your test is complete, the fun begins. You’ll have data to help you determine how this test went and can decide from there what your next test should focus on.
For instance, let’s say you ran two test variations of a button against your control: One that changed the button’s color but not its text, and one that changed the CTA but not its color.
From your test results, you find that the change in button color resulted in a 3% lower click-through rate, whereas the text change resulted in a 5% higher click-through rate. Now, for your next test, you’ll want to test new variations on the text and leave the button’s design alone.
Here’s a handy hint: If you use Adobe Analytics to collect and report on data, you can also use the Analytics for Target integration. This feature of Adobe Analytics enables you to apply success metrics and audiences you’ve already defined in Analytics to your A/B tests in Adobe Target. It also enables Adobe Analytics to collect and report on findings from your Adobe Target activities.
Conclusion
After learning about Adobe Target’s various testing modes and how to execute them, we hope you are inspired to enhance your A/B testing.
While there are a lot of options out there for managing A/B tests, few give the same level of flexibility and freedom to design, allocate, and measure testing as Adobe Target.
We’ll also be the first to acknowledge that implementing a complex solution like Adobe Target isn’t always an easy process for businesses to accomplish on their own. It does require a knowledgeable tech team to help ensure you’re connected to your existing platform stack.
But if you don’t have a tech team with the time and expertise to do so currently, you can still get started testing in Adobe Target with the help of a dedicated implementation team!